
gocv alternatives and similar packages
Based on the "Images" category.
Alternatively, view gocv alternatives based on common mentions on social networks and blogs.
-
-
pigo
Fast face detection, pupil/eyes localization and facial landmark points detection library in pure Go. -
-
-
-
darkroom
An image proxy with changeable storage backends and image processing engines with focus on speed and resiliency. -
-
fastimage
Finds the type and/or size of a remote image given its uri, by fetching as little as needed. -
LookUp
:mag: Pure Go implementation of fast image search and simple OCR, focused on reading info from screenshots -
webp-server
Simple and minimal image server capable of storing, resizing, converting and caching images.

WorkOS - The modern identity platform for B2B SaaS


Do you think we are missing an alternative of gocv or a related project?


README
GoCV

![]()
![]()
![]()
The GoCV package provides Go language bindings for the OpenCV 4 computer vision library.
The GoCV package supports the latest releases of Go and OpenCV (v4.6.0) on Linux, macOS, and Windows. We intend to make the Go language a "first-class" client compatible with the latest developments in the OpenCV ecosystem.
GoCV supports CUDA for hardware acceleration using Nvidia GPUs. Check out the [CUDA README](./cuda/README.md) for more info on how to use GoCV with OpenCV/CUDA.
GoCV also supports Intel OpenVINO. Check out the [OpenVINO README](./openvino/README.md) for more info on how to use GoCV with the Intel OpenVINO toolkit.
How to use
Hello, video
This example opens a video capture device using device "0", reads frames, and shows the video in a GUI window:
package main

import (
    "gocv.io/x/gocv"
)

func main() {
    webcam, _ := gocv.OpenVideoCapture(0)
    window := gocv.NewWindow("Hello")
    img := gocv.NewMat()

    for {
        webcam.Read(&img)
        window.IMShow(img)
        window.WaitKey(1)
    }
}
Face detect
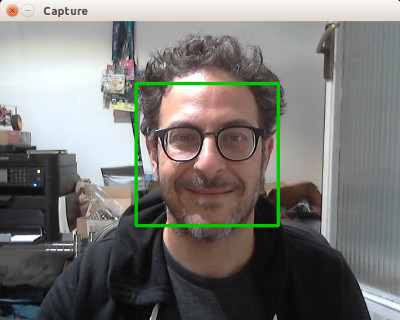
This is a more complete example that opens a video capture device using device "0". It also uses the CascadeClassifier class to load an external data file containing the classifier data. The program grabs each frame from the video, then uses the classifier to detect faces. If any faces are found, it draws a green rectangle around each one, then displays the video in an output window:
package main

import (
    "fmt"
    "image/color"

    "gocv.io/x/gocv"
)

func main() {
    // set to use a video capture device 0
    deviceID := 0

    // open webcam
    webcam, err := gocv.OpenVideoCapture(deviceID)
    if err != nil {
        fmt.Println(err)
        return
    }
    defer webcam.Close()

    // open display window
    window := gocv.NewWindow("Face Detect")
    defer window.Close()

    // prepare image matrix
    img := gocv.NewMat()
    defer img.Close()

    // color for the rect when faces detected
    blue := color.RGBA{0, 0, 255, 0}

    // load classifier to recognize faces
    classifier := gocv.NewCascadeClassifier()
    defer classifier.Close()

    if !classifier.Load("data/haarcascade_frontalface_default.xml") {
        fmt.Println("Error reading cascade file: data/haarcascade_frontalface_default.xml")
        return
    }

    fmt.Printf("start reading camera device: %v\n", deviceID)
    for {
        if ok := webcam.Read(&img); !ok {
            fmt.Printf("cannot read device %v\n", deviceID)
            return
        }
        if img.Empty() {
            continue
        }

        // detect faces
        rects := classifier.DetectMultiScale(img)
        fmt.Printf("found %d faces\n", len(rects))

        // draw a rectangle around each face on the original image
        for _, r := range rects {
            gocv.Rectangle(&img, r, blue, 3)
        }

        // show the image in the window, and wait 1 millisecond
        window.IMShow(img)
        window.WaitKey(1)
    }
}
More examples
There are examples in the [cmd directory](./cmd) of this repo in the form of various useful command line utilities, such as [capturing an image file](./cmd/saveimage), [streaming mjpeg video](./cmd/mjpeg-streamer), [counting objects that cross a line](./cmd/counter), and [using OpenCV with Tensorflow for object classification](./cmd/tf-classifier).
How to install
To install GoCV, you must first have the matching version of OpenCV installed on your system. The current release of GoCV requires OpenCV 4.6.0.
Here are instructions for Ubuntu, Raspian, macOS, and Windows.
Ubuntu/Linux
Installation
You can use make to install OpenCV 4.6.0 with the handy Makefile included with this repo. If you already have installed OpenCV, you do not need to do so again. The installation performed by the Makefile is minimal, so it may remove OpenCV options such as Python or Java wrappers if you have already installed OpenCV some other way.
Quick Install
First, change directories to where you want to install GoCV, and then use git to clone the repository to your local machine like this:
cd $HOME/folder/with/your/src/
git clone https://github.com/hybridgroup/gocv.git
Make sure to change $HOME/folder/with/your/src/ to where you actually want to save the code.
Once you have cloned the repo, the following commands should do everything to download and install OpenCV 4.6.0 on Linux:
cd gocv
make install
If you need static opencv libraries
make install BUILD_SHARED_LIBS=OFF
If it works correctly, at the end of the entire process, the following message should be displayed:
gocv version: 0.31.0
opencv lib version: 4.6.0
That's it, now you are ready to use GoCV.
Using CUDA with GoCV
See the [cuda directory](./cuda) for information.
Using OpenVINO with GoCV
See the [openvino directory](./openvino) for information.
Make Install for OpenVINO and Cuda
The following commands should do everything to download and install OpenCV 4.6.0 with CUDA and OpenVINO on Linux. Make sure to change $HOME/folder/with/your/src/ to the directory you used to clone GoCV:
cd $HOME/folder/with/gocv/
make install_all
If you need static opencv libraries
make install_all BUILD_SHARED_LIBS=OFF
If it works correctly, at the end of the entire process, the following message should be displayed:
gocv version: 0.31.0
opencv lib version: 4.6.0-openvino
cuda information:
  Device 0:  "GeForce MX150"  2003Mb, sm_61, Driver/Runtime ver.10.0/10.0
Complete Install
If you have already done the "Quick Install" as described above, you do not need to run any further commands. For the curious, or for custom installations, here are the details for each of the steps that are performed when you run make install.
First, change directories to where you want to install GoCV, and then use git to clone the repository to your local machine like this:
cd $HOME/folder/with/your/src/
git clone https://github.com/hybridgroup/gocv.git
Make sure to change $HOME/folder/with/your/src/ to where you actually want to save the code.
Install required packages
First, you need to change the current directory to the location where you cloned the GoCV repo, so you can access the Makefile:
cd $HOME/folder/with/your/src/gocv
Next, you need to update the system, and install any required packages:
make deps
Download source
Now, download the OpenCV 4.6.0 and OpenCV Contrib source code:
make download
Build
Build everything. This will take quite a while:
make build
If you need static opencv libraries
make build BUILD_SHARED_LIBS=OFF
Install
Once the code is built, you are ready to install:
make sudo_install
Verifying the installation
To verify your installation you can run one of the included examples.
First, change the current directory to the location of the GoCV repo:
cd $HOME/src/gocv.io/x/gocv
Now you should be able to build or run any of the examples:
go run ./cmd/version/main.go
The version program should output the following:
gocv version: 0.31.0
opencv lib version: 4.6.0
Cleanup extra files
After the installation is complete, you can remove the extra files and folders:
make clean
Custom Environment
By default, pkg-config is used to determine the correct flags for compiling and linking OpenCV. This behavior can be disabled by supplying -tags customenv when building/running your application. When building with this tag you will need to supply the CGO environment variables yourself.
For example:
export CGO_CPPFLAGS="-I/usr/local/include"
export CGO_LDFLAGS="-L/usr/local/lib -lopencv_core -lopencv_face -lopencv_videoio -lopencv_imgproc -lopencv_highgui -lopencv_imgcodecs -lopencv_objdetect -lopencv_features2d -lopencv_video -lopencv_dnn -lopencv_xfeatures2d"
Please note that you will need to run these 2 lines of code one time in your current session in order to build or run the code, in order to setup the needed ENV variables. Once you have done so, you can execute code that uses GoCV with your custom environment like this:
go run -tags customenv ./cmd/version/main.go
Docker
The project now provides Dockerfile which lets you build GoCV Docker image which you can then use to build and run GoCV applications in Docker containers. The Makefile contains docker target which lets you build Docker image with a single command:
make docker
By default Docker image built by running the command above ships Go version 1.16.5, but if you would like to build an image which uses different version of Go you can override the default value when running the target command:
make docker GOVERSION='1.15'
Running GUI programs in Docker on macOS
Sometimes your GoCV programs create graphical interfaces like windows eg. when you use gocv.Window type when you display an image or video stream. Running the programs which create graphical interfaces in Docker container on macOS is unfortunately a bit elaborate, but not impossible. First you need to satisfy the following prerequisites:
- install xquartz. You can also install xquartz using homebrew by running
brew cask install xquartz - install socat
brew install socat
Note, you will have to log out and log back in to your machine once you have installed xquartz. This is so the X window system is reloaded.
Once you have installed all the prerequisites you need to allow connections from network clients to xquartz. Here is how you do that. First run the following command to open xquart so you can configure it:
open -a xquartz
Click on Security tab in preferences and check the "Allow connections" box:
[app image](./images/xquartz.png)
Next, you need to create a TCP proxy using socat which will stream X Window data into xquart. Before you start the proxy you need to make sure that there is no process listening in port 6000. The following command should not return any results:
lsof -i TCP:6000
Now you can start a local proxy which will proxy the X Window traffic into xquartz which acts a your local X server:
socat TCP-LISTEN:6000,reuseaddr,fork UNIX-CLIENT:\"$DISPLAY\"
You are now finally ready to run your GoCV GUI programs in Docker containers. In order to make everything work you must set DISPLAY environment variables as shown in a sample command below:
docker run -it --rm -e DISPLAY=docker.for.mac.host.internal:0 your-gocv-app
Note, since Docker for MacOS does not provide any video device support, you won't be able run GoCV apps which require camera.
Alpine 3.7 Docker image
There is a Docker image with Alpine 3.7 that has been created by project contributor @denismakogon. You can find it located at https://github.com/denismakogon/gocv-alpine.
Raspbian
Installation
We have a special installation for the Raspberry Pi that includes some hardware optimizations. You use make to install OpenCV 4.6.0 with the handy Makefile included with this repo. If you already have installed OpenCV, you do not need to do so again. The installation performed by the Makefile is minimal, so it may remove OpenCV options such as Python or Java wrappers if you have already installed OpenCV some other way.
Quick Install
First, change directories to where you want to install GoCV, and then use git to clone the repository to your local machine like this:
cd $HOME/folder/with/your/src/
git clone https://github.com/hybridgroup/gocv.git
Make sure to change $HOME/folder/with/your/src/ to where you actually want to save the code.
The following make command should do everything to download and install OpenCV 4.6.0 on Raspbian:
cd $HOME/folder/with/your/src/gocv
make install_raspi
If it works correctly, at the end of the entire process, the following message should be displayed:
gocv version: 0.31.0
opencv lib version: 4.6.0
That's it, now you are ready to use GoCV.
macOS
Installation
You can install OpenCV 4.6.0 using Homebrew.
If you already have an earlier version of OpenCV (3.4.x) installed, you should probably remove it before installing the new version:
brew uninstall opencv
You can then install OpenCV 4.6.0:
brew install opencv
pkgconfig Installation
pkg-config is used to determine the correct flags for compiling and linking OpenCV. You can install it by using Homebrew:
brew install pkgconfig
Verifying the installation
To verify your installation you can run one of the included examples.
First, change the current directory to the location of the GoCV repo:
cd $HOME/folder/with/your/src/gocv
Now you should be able to build or run any of the examples:
go run ./cmd/version/main.go
The version program should output the following:
gocv version: 0.31.0
opencv lib version: 4.6.0
Custom Environment
By default, pkg-config is used to determine the correct flags for compiling and linking OpenCV. This behavior can be disabled by supplying -tags customenv when building/running your application. When building with this tag you will need to supply the CGO environment variables yourself.
For example:
export CGO_CXXFLAGS="--std=c++11"
export CGO_CPPFLAGS="-I/usr/local/Cellar/opencv/4.6.0/include"
export CGO_LDFLAGS="-L/usr/local/Cellar/opencv/4.6.0/lib -lopencv_stitching -lopencv_superres -lopencv_videostab -lopencv_aruco -lopencv_bgsegm -lopencv_bioinspired -lopencv_ccalib -lopencv_dnn_objdetect -lopencv_dpm -lopencv_face -lopencv_photo -lopencv_fuzzy -lopencv_hfs -lopencv_img_hash -lopencv_line_descriptor -lopencv_optflow -lopencv_reg -lopencv_rgbd -lopencv_saliency -lopencv_stereo -lopencv_structured_light -lopencv_phase_unwrapping -lopencv_surface_matching -lopencv_tracking -lopencv_datasets -lopencv_dnn -lopencv_plot -lopencv_xfeatures2d -lopencv_shape -lopencv_video -lopencv_ml -lopencv_ximgproc -lopencv_calib3d -lopencv_features2d -lopencv_highgui -lopencv_videoio -lopencv_flann -lopencv_xobjdetect -lopencv_imgcodecs -lopencv_objdetect -lopencv_xphoto -lopencv_imgproc -lopencv_core"
Please note that you will need to run these 3 lines of code one time in your current session in order to build or run the code, in order to setup the needed ENV variables. Once you have done so, you can execute code that uses GoCV with your custom environment like this:
go run -tags customenv ./cmd/version/main.go
Windows
Installation
The following assumes that you are running a 64-bit version of Windows 10.
In order to build and install OpenCV 4.6.0 on Windows, you must first download and install MinGW-W64 and CMake, as follows.
MinGW-W64
Download and run the MinGW-W64 compiler installer from https://sourceforge.net/projects/mingw-w64/files/Toolchains%20targetting%20Win32/Personal%20Builds/mingw-builds/8.1.0/.
The latest version of the MinGW-W64 toolchain is 8.1.0, but any version from 8.X on should work.
Choose the options for "posix" threads, and for "seh" exceptions handling, then install to the default location c:\Program Files\mingw-w64\x86_64-8.1.0-posix-seh-rt_v6-rev0.
Add the C:\Program Files\mingw-w64\x86_64-8.1.0-posix-seh-rt_v6-rev0\mingw64\bin path to your System Path.
CMake
Download and install CMake https://cmake.org/download/ to the default location. CMake installer will add CMake to your system path.
OpenCV 4.6.0 and OpenCV Contrib Modules
The following commands should do everything to download and install OpenCV 4.6.0 on Windows:
chdir %GOPATH%\src\gocv.io\x\gocv
win_build_opencv.cmd
It might take up to one hour.
Last, add C:\opencv\build\install\x64\mingw\bin to your System Path.
Verifying the installation
Change the current directory to the location of the GoCV repo:
chdir %GOPATH%\src\gocv.io\x\gocv
Now you should be able to build or run any of the command examples:
go run cmd\version\main.go
The version program should output the following:
gocv version: 0.31.0
opencv lib version: 4.6.0
That's it, now you are ready to use GoCV.
Custom Environment
By default, OpenCV is expected to be in C:\opencv\build\install\include. This behavior can be disabled by supplying -tags customenv when building/running your application. When building with this tag you will need to supply the CGO environment variables yourself.
Due to the way OpenCV produces DLLs, including the version in the name, using this method is required if you're using a different version of OpenCV.
For example:
set CGO_CXXFLAGS="--std=c++11"
set CGO_CPPFLAGS=-IC:\opencv\build\install\include
set CGO_LDFLAGS=-LC:\opencv\build\install\x64\mingw\lib -lopencv_core460 -lopencv_face460 -lopencv_videoio460 -lopencv_imgproc460 -lopencv_highgui460 -lopencv_imgcodecs460 -lopencv_objdetect460 -lopencv_features2d460 -lopencv_video460 -lopencv_dnn460 -lopencv_xfeatures2d460 -lopencv_plot460 -lopencv_tracking460 -lopencv_img_hash460
Please note that you will need to run these 3 lines of code one time in your current session in order to build or run the code, in order to setup the needed ENV variables. Once you have done so, you can execute code that uses GoCV with your custom environment like this:
go run -tags customenv cmd\version\main.go
Android
There is some work in progress for running GoCV on Android using Gomobile. For information on how to install OpenCV/GoCV for Android, please see: https://gist.github.com/ogero/c19458cf64bd3e91faae85c3ac887481
See original discussion here: https://github.com/hybridgroup/gocv/issues/235
Profiling
Since memory allocations for images in GoCV are done through C based code, the go garbage collector will not clean all resources associated with a Mat. As a result, any Mat created must be closed to avoid memory leaks.
To ease the detection and repair of the resource leaks, GoCV provides a Mat profiler that records when each Mat is created and closed. Each time a Mat is allocated, the stack trace is added to the profile. When it is closed, the stack trace is removed. See the runtime/pprof documentation.
In order to include the MatProfile custom profiler, you MUST build or run your application or tests using the -tags matprofile build tag. For example:
go run -tags matprofile cmd/version/main.go
You can get the profile's count at any time using:
gocv.MatProfile.Count()
You can display the current entries (the stack traces) with:
var b bytes.Buffer
gocv.MatProfile.WriteTo(&b, 1)
fmt.Print(b.String())
This can be very helpful to track down a leak. For example, suppose you have the following nonsense program:
package main

import (
    "bytes"
    "fmt"

    "gocv.io/x/gocv"
)

func leak() {
    gocv.NewMat()
}

func main() {
    fmt.Printf("initial MatProfile count: %v\n", gocv.MatProfile.Count())
    leak()

    fmt.Printf("final MatProfile count: %v\n", gocv.MatProfile.Count())
    var b bytes.Buffer
    gocv.MatProfile.WriteTo(&b, 1)
    fmt.Print(b.String())
}
Running this program produces the following output:
initial MatProfile count: 0
final MatProfile count: 1
gocv.io/x/gocv.Mat profile: total 1
1 @ 0x40b936c 0x40b93b7 0x40b94e2 0x40b95af 0x402cd87 0x40558e1
#   0x40b936b   gocv.io/x/gocv.newMat+0x4b  /go/src/gocv.io/x/gocv/core.go:153
#   0x40b93b6   gocv.io/x/gocv.NewMat+0x26  /go/src/gocv.io/x/gocv/core.go:159
#   0x40b94e1   main.leak+0x21          /go/src/github.com/dougnd/gocvprofexample/main.go:11
#   0x40b95ae   main.main+0xae          /go/src/github.com/dougnd/gocvprofexample/main.go:16
#   0x402cd86   runtime.main+0x206      /usr/local/Cellar/go/1.11.1/libexec/src/runtime/proc.go:201
We can see that this program would leak memory. As it exited, it had one Mat that was never closed. The stack trace points to exactly which line the allocation happened on (line 11, the gocv.NewMat()).
Furthermore, if the program is a long running process or if GoCV is being used on a web server, it may be helpful to install the HTTP interface )). For example:
package main

import (
    "net/http"
    _ "net/http/pprof"
    "time"

    "gocv.io/x/gocv"
)

func leak() {
    gocv.NewMat()
}

func main() {
    go func() {
        ticker := time.NewTicker(time.Second)
        for {
            <-ticker.C
            leak()
        }
    }()

    http.ListenAndServe("localhost:6060", nil)
}
This will leak a Mat once per second. You can see the current profile count and stack traces by going to the installed HTTP debug interface: http://localhost:6060/debug/pprof/gocv.io/x/gocv.Mat.
How to contribute
Please take a look at our [CONTRIBUTING.md](./CONTRIBUTING.md) document to understand our contribution guidelines.
Then check out our [ROADMAP.md](./ROADMAP.md) document to know what to work on next.
Why this project exists
The https://github.com/go-opencv/go-opencv package for Go and OpenCV does not support any version above OpenCV 2.x, and work on adding support for OpenCV 3 had stalled for over a year, mostly due to the complexity of SWIG. That is why we started this project.
The GoCV package uses a C-style wrapper around the OpenCV 4 C++ classes to avoid having to deal with applying SWIG to a huge existing codebase. The mappings are intended to match as closely as possible to the original OpenCV project structure, to make it easier to find things, and to be able to figure out where to add support to GoCV for additional OpenCV image filters, algorithms, and other features.
For example, the OpenCV videoio module wrappers can be found in the GoCV package in the videoio.* files.
This package was inspired by the original https://github.com/go-opencv/go-opencv project, the blog post https://medium.com/@peterleyssens/using-opencv-3-from-golang-5510c312a3c and the repo at https://github.com/sensorbee/opencv thank you all!
License
Licensed under the Apache 2.0 license. Copyright (c) 2017-2021 The Hybrid Group.
Logo generated by GopherizeMe - https://gopherize.me
*Note that all licence references and agreements mentioned in the gocv README section above
are relevant to that project's source code only.